I don't recall if I've mentioned yet that this year I began meal planning. I just needed a change, to be honest. As a full-time working Mom, I feel like every minute I get with my kids and hubby outside of work is precious, and I was spending
hours every evening deciding what to make based on what I had on hand, possibly a run to the grocery store, then prepping, making, serving and cleaning up supper. It was getting out of hand, and I felt that it was a total waste of the time I had with my family each evening. So in January, I decided that I needed to give this meal planning thing a try.
It has worked AWESOME for us as a family. Some times I get a little behind and we do it day by day still, but a few things have really helped, so I thought I'd walk you through the process I go through each week.
Meal Planning Essentials
In this digital age, manual methods for meal planning have kinda gone to the side for me. I really did try to write it all down, but the problem with writing it down is when I don't have that piece of paper or notebook with me or lose it, or need to add something to my list and can't remember long enough to get to my purse to pull it out. I did the "post it on the fridge" thing, but to be honest, my family just didn't really care to check it out, so I was making list after list after list, and it seemed counterproductive. Enter these three programs or apps that I use extensively. I love having accessibility to these from any computer and/or from my smartphone. It makes everything SO much easier to plan. Here is a short rundown:
Google Calendar
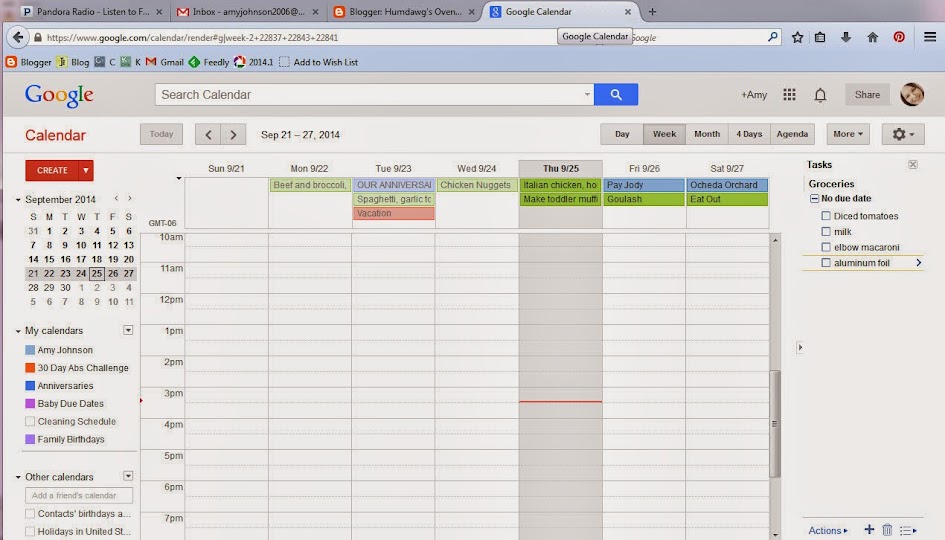
The biggest essential part of the process is using my
Google Calendar. It is HUGE, because I can access this list from a variety of places: My phone, my work PC, my home PC, my tablet, anyone elses' PC or tablet...you get the picture. I'm sure there are plenty of other apps or devices that are helpful, but this is what I use.
I keep our lives on Google Calendar, so it helps when I'm planning to see our week in advance, and if I know that on Tuesdays Mark is going to be gone, I'll make it a little easier on myself that night, and if I know he'll be home and the weather is going to be junky, I'll plan something possibly a little more prep-intensive.
GTasks
Alongside Google Calendar is GTasks (they're actually integrated on the web), which is also pretty huge, because as I'm making my menu, I can create my grocery list, which then syncs with my phone, and BAM - no paper list to lose on the way to the store. You can see my "GTasks" column on the picture above tied right in with Google Calendar, but it's a separate app on my phone.
Pinterest
The nice part about actually planning our your menu for the week is that it allows you to try new things without it being too much of a hassle. It's just as easy to try a new recipe as an old standby when you have to look up the ingredient list for both. Pinterest has been a great tool to make it easy to find recipes I've come across that I want to try. The nice part about having a cooking blog is that if I've tried a recipe that I didn't find online (i.e. from a co-worker or friend or magazine in the waiting room at the doctor's office or something), I can blog about it and then pin the blog post. Sometimes I also enter the ingredients into my Google Calendar entry for the meal plan so I don't have to search for the list when making my list.
I have separate Pinterest boards for each month of the year, and when it's time to plan meals, I go ahead and look to see what's there. Whatever I don't make that month and is still on that month's board at the end of the month, I move all the pins to the next month's board so I have them ready and available again. This means that a good chunk of my boards are empty, but at least there are placeholders there.
I have found so many great recipes on Pinterest, including (but not limited to) Italian beef sandwiches, Italian chicken sandwiches, Spicy Sausage Pasta, Sausage Mushroom Tortellini Soup, and Lasagna Soup. Some of the recipes have been total fails, which is to be expected, but overall, Pinterest has been a fantastic tool to help me with meal planning.
My Meal Planning "Rules"
Usually I start the week before and begin filling in a meal here and there, depending on what sounds good. This is based on the following thought process:
- I try to mix it up and vary the meat each night, so if we have a chicken dish one night, I aim for beef or pork or seafood the next night: The goal is to not have the same meat two nights in a row. While I know some people try to throw a vegetarian meal into the mix once a week, it has just never worked well for us: We're meat eaters, and I highly doubt anything is going to change that.
- I try not to make anything we've had in the past 2 weeks.
- If we eat out, it's almost always on the weekends but not during the week unless it's a very busy week. If we eat out during the week, it's usually on Tuesdays and we get the Godfather's "Top it Tuesday" deal.
- I always plan to have leftovers for the next day's lunch.
- With little kids, I try not to have big chunks of meat, as they don't eat those well. Shredded or ground meats work well. I'll still do big chunks of meat, but plan ahead to need to come up with something more easily edible for the little ones.
- I try to have one new recipe every week.
- I also try to have one tried and true recipe each week.
- I do at least 1-2 crockpot meals a week.
- Keep in mind what we have in the deep freezer and try to use older items soon.
The Planning Process
I don't really think through this process, to be honest with you, as it is usually a pretty mindless part of my week now. But when I sit down and think about it, I guess there is a sort of process, so here it is:
Step 1: Pick out recipes for the week
Sometimes I do this as the week goes along, but sometimes I just sit down all at once and put them all in at the same time. It depends on how busy our week is, for the most part.
Step 2: Put menu plan into my Google Calendar.
Sometimes it's at a computer, sometimes on my phone, but either way, I do it throughout the week. It takes seconds to add a recipe, and seconds to move them around. The "hardest" part is coming up with recipes.
Step 3: Look up recipe ingredients
Check to see what all I need, and ALWAYS look at the recipe, even if I have the recipe memorized: There's always that one thing I forget (like mushrooms for spaghetti or that can of evaporated milk for Grandma Vi's meatballs), and forgetting that one thing ends up costing us approximately $40 extra bucks a week, because who can go to the store and walk out with ONLY what they went in for, ya know? We always walk out with other snacks or sale items. Always. Check and double check your list. You *think* you have ground beef in the freezer? Make sure. You are pretty sure you've got cumin? Double-check. It takes minutes, but not double-checking is costly.
Step 4: Make a grocery list using GTasks
The best thing about GTasks is that, since my phone is usually nearby, I can add something at any time. Last night we ran out of ketchup, and I added it to my list immediately. It has been a lifesaver for other household items, like lightbulbs, toilet paper, paper towels, laundry soap...all those things that you forget about the second you walk away from that task.
Step 5: Add in the extras
If there is one part of my little system that I fail at regularly, it's this one. I'm really really bad at remembering to get things that aren't officially part of my meal plan. REALLY bad. But I'm trying to get better.
This can be broken into three parts, really: Sale items, snacks and beverages
Sale Items
I used to basically only shop the ads and buy off them, but what I ended up with was a lot of snacks and canned goods, but no real ingredients for meals. I do take this into account when working on step 1, but I try to only stock up on things that we use regularly (i.e. canned tomatoes, beans, meat sales, etc.). Sometimes I'll throw in ice cream or something fun like that, but I don't look at the ads nearly as much as I used to. I'm thrilled if some of the ingredients from the recipes I planned for the week are on sale.
Snacks
One thing I've been trying to get better at (especially with toddlers at home) is planning for snacks. I'm horrible at remembering that, and then when the boys are hungry, I'm just forgetful. Some staples I try to have on hand always are easy-to-grab fruits (mini apples, grapes, fruit cups), cheese, crackers, raisins, applesauce pouches...you get the picture. It's a lot easier to make supper when you don't have kids clinging to your legs, and it's a lot easier to prevent that when you can hand them an applesauce pouch or bowl of grapes to help their tummy.
But it's not just for the kids either: Mark and I work at the same place, and it's important to avoid the snack machine. I try to keep some healthy snacks in my overhead cabinet at work, but sometimes I run out and forget to restock until I'm super hungry and have no willpower, and then run to the vending machine. Two bucks and 800 calories later, I feel cruddy and wish I'd just re-stocked my cabinet.
Beverages
Another thing I'm guilty of is not varying beverages: We drink a ton of milk, but not so much juice. But then again, I forget to buy juice because I don't like to drink my calories. But my family? They LOOOOVVVVEEE juice. So I need to remember to add it to the list. I am really really bad at remembering to pick up creamer for my coffee too until I'm all out.
We buy our milk on either Milk Mondays at HyVee (3/$10) or at the gas station (2/$7), but we never ever ever go to the grocery store to buy milk when it's not our weekly grocery shopping trip.
Step 6: Go to the store...without kids
This part will take me 20 minutes tops when I am by myself, but it can drag into an hour with a toddler or two around. I usually pick Sunday afternoons during nap times if I can, or else Mondays right after work before picking up the kids from daycare. If you are a stay-at-home Mom, either give the list to your hubby to pick up on his way home from work or go whenever you can get away without the kids.
This isn't to say that I don't go to the store with the kids sometimes: Cashel always begs to go these days because he's kinda into getting suckers at the check out. But when I go, I have a game plan, and I make it as fast as I can. The longer you are in the store, the more impulse buys you'll make.
Don't walk up and down every aisle. If you have sorted your list into areas of the store, it's most helpful. But whatever you do, get in and get out. The faster you go, the better off you'll be. Cross off your items as you go, make sure you've got everything, but when you dawdle, you not only waste time, but you end up getting more junk that you don't need.
Implementation: Is it Working?
In a word: YES!
Oh my goodness has it been awesome. We have cut down
significantly on our grocery bill for our growing family of four. We spend between $75-110 per week now as opposed to the $120-140 we had been spending. Most weeks are around $80-85 as long as we don't throw diapers and wipes into the equation.
Speaking of diapers and wipes, we don't shop for those weekly. We usually bulk order them off diapers.com and have them shipped directly to our house (free 2-day shipping) once a month.
I will absolutely keep this process up. It is so mindless for me at this point, and it makes an enormous difference not only in the cost and time savings, but it also is great that we get to try new things every week, and that I know what to prep and what to have ready for the next night. I'm able to spend a lot more time with my family in the evenings, and I'm a lot less stressed about meals.
I know that this post probably seems ominous, but it's really pretty simple. The whole process takes me approximately 20 minutes a week, and then 20-30 minutes at the grocery store. Without this process, I'd sometimes spend upwards of an hour trying to figure out what to make, getting the right ingredients and making supper for one single night. OR...we'd be eating mac & cheese or McDonald's or Chinese takeout multiple times a week. I just use the time up front to plan. It works for us.
If you have any questions, comments or suggestions, let me know! I'm definitely not an expert, but I'd like to think that in the past 10 months I've learned how to make this work for my family.
Oh, and I'm not sure that I need to say this, but Google and Pinterest don't even have a clue that I'm writing this post, so I'm not getting compensated in any way, shape or form.