Monday, August 22, 2011

Zucchini "Fries"

I have a confession to make: I'm a blog stalker.

There are quite a few blogs I follow via RSS feed, but this one is one I tend to save for a rainy day. When this particular recipe for Crispy Baked Zucchini Sticks came across my plate from Shawnda, a.k.a. "Foodie Bride" a few weeks ago, though, I just had to try it! We did, after all, have a TON of zucchini growing in our garden.

I'll begin by saying I'm ecstatic that we have so much zucchini growing in our garden, simply because this recipe is pretty fantastic!


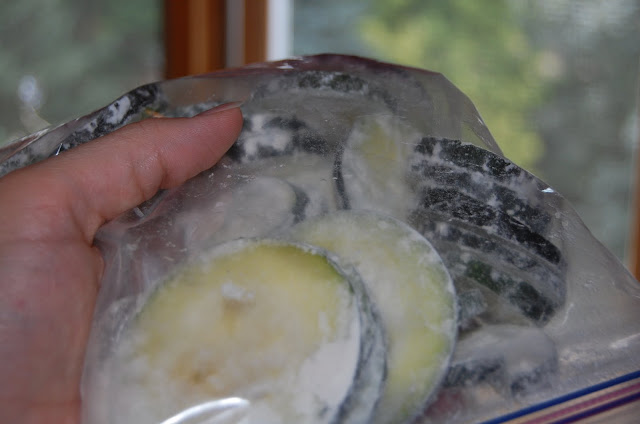
You start off by slicing up the zucchini however you want. I did mine in slices, but in the original recipe, Shawnda did hers in sticks.

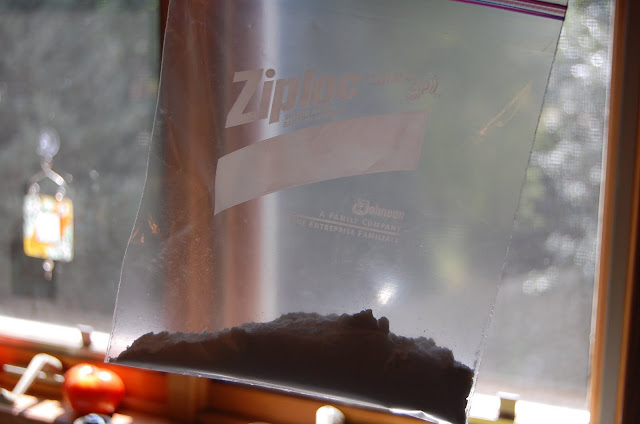
Fill a ziplock bag with 1/4 C flour.

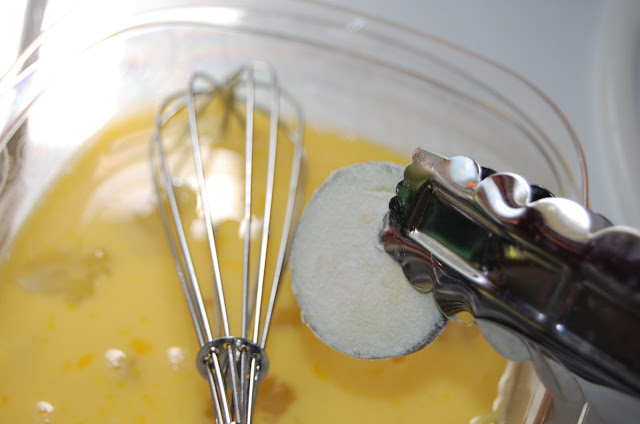
Beat 2 eggs with 1 Tbsp water in a shallow dish.

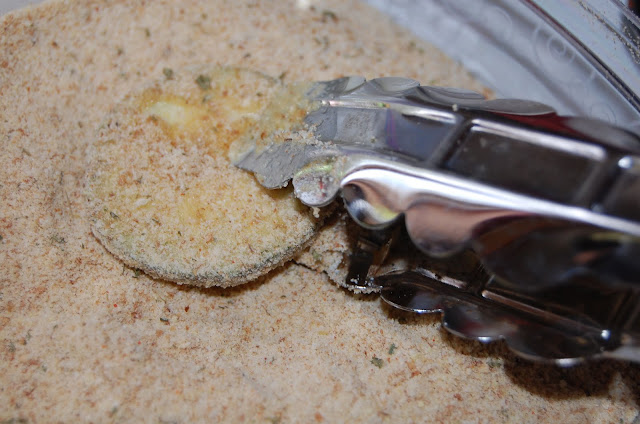
Combine breading mixture (2 cups Panko breadcrumbs, Salt, Pepper, 1/2 tsp garlic powder, 1/4 tsp cayenne pepper) in a shallow container.

Add the zucchini slices to the bag containing the flour and shake to coat

Using tongs (or your fingers or whatever you want), dip each flour-coated slice in the egg mixture.

Then dip the egg-coated slices in the bread crumb mixture and set aside.


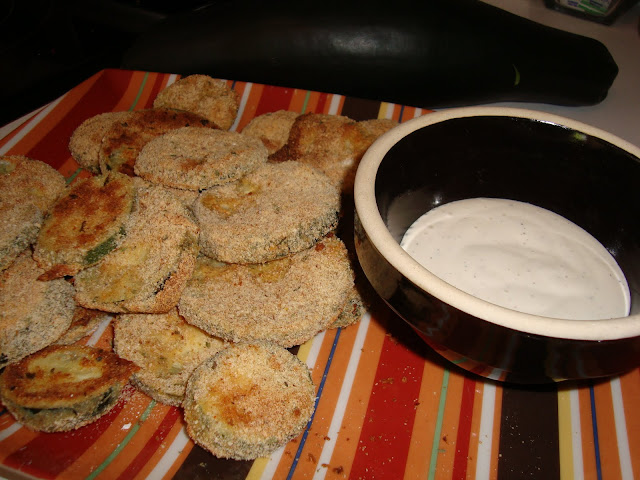
When the slices are nice and golden brown, take them out and let cool for 5 minutes.

Serve with your favorite sauce - we tried Ranch dressing and it was a home run!


Thank you so much, Shawnda for this great recipes! Now we won't cringe when we see large zucchini growing in our garden :)

Saturday, August 20, 2011

Freezing Corn (2011)

When you live in the midwest, you come to know certain things. Like, you know that most likely, when the weather starts getting nice, the wind begins to blow. And you also know that when the weather is nice and the wind stops blowing that the bugs will be out. You also know that there are a few genius ways to pass those hot summer days: strawberry or raspberry shakes at the county fair, a nice tall glass of lemonade, long days spent out at the lake keeping cool, and eating so much glorious sweet corn that you aren't sure you can take anymore (and of course, then you do).

Two years ago at Thanksgiving, I had my first experience with tasting freezer corn. It was at that point that I decided we MUST have our own. So last year, I froze my first batch. My big mistake? Not freezing enough of it! We ran out in mid-May, and have been waiting patiently for August to roll around to get more.

Now it's not that you can't find fresh corn on the cob at any grocery store beginning in mid-June: You can! But after living in Minnesota for almost 5 years now, you come to know that the cream of the crop ends up not being ready until mid-August.

The biggest secret to freezer corn is the corn! I've heard of plenty of recipes where you slather the corn in cream cheese, heavy cream and lots of other artery-clogging stuff, but this is the cleanest, freshest recipe, and it's fantastic! The secret? The corn has to be mouth-watering by itself!

The first step (beyond making sure you have sugar, water and salt on hand) is the husking, which Mark and I tackled on a beautiful morning on our kitchen deck.


Of course, you'll want to have some sort of place to put the freshly-husked cobs. This is just a small sneak peak at what we had - doesn't it make your mouth water?


The next step is to cut the kernels off the cob.

And then, once you've got 16 cups of corn (I had to measure two of these)...

...you put it in a large stockpot.

You then add 4 cups of water, 1 cup of sugar and 4 tsp of salt.

And then? You cook it, and it gets to smelling SO delicious!

It bubbles, and it foams, and it teases your tastebuds!


And then? When it has boiled for 10 minutes, you set it aside and let it cool for a few hours.

We like to bag ours, but I suppose you could put it in containers as well. Either way, make sure it's a good, tight seal to ward off any freezer burn!

I'm very much looking forward to having some freezer corn when it's cold and snowy outside, and thinking back on this beautiful summer day when we froze it all :)

Thursday, August 18, 2011

Swedish Meatballs

I'd like to pretend that the reason I decided to make Swedish meatballs is because my hubby is part Swedish. But truth be told, I made them because they're tasty, incredibly easy, and they make my Swedish stud very very happy :) But in reality, it's a recipe my very non-Swedish mother used to make us very non-Swedish kids growing up, and it's delicious!


Beyond making the meatballs for this recipe, making Swedish Meatballs is so simple it's ridiculous!

Ingredients
1lb ground beef, formed into meatballs
1 white onion, diced
1 sm. package fresh mushrooms, sliced
1 can cream of mushroom soup
1 C milk
1/4 C or more sour cream
salt and pepper to taste


You make the meatballs (Mark likes to add an egg and crackers to hold it together).
You cook the meatballs in a frying pan until browned.
You sautee the mushrooms and onions alongside the browned meatballs.
You add the milk, sour cream and cream of mushroom soup and salt and pepper.
You simmer for 20 minutes.
You serve either over egg noodles or mashed taters (or if you want, a baked tater).

If you aren't a big meat eater, you could make it with just another container of fresh mushrooms and I think it'd be just as delicious!

Mom's Fabulous Potato Soup

One of my favorite meals growing up, and my younger sister's normally-requested birthday supper was Mom's potato soup.

Of course, there's probably a reason we loved it so: It's not exactly good for you...at ALL. While its true: There are lots of veggies in there, there is also a ton of butter and a can of evaporated milk. So yeah - definitely not the greatest for you. But delicious, nonetheless, and the perfect way to warm up on a cold fall evening.


Mom's Potato Soup
  • 6 medium potatoes, diced
  • 1 carrot, diced
  • 1 celery bunch, chopped
  • 2 onions, diced
  • 4 chicken boullion cubes
  • 1 can (13oz) evaporated milk
  • 5 C water
  • 1 Tbsp parsley flakes
  • 1 Tbsp salt
  • pepper to taste
  • 1/2 (1 stick) butter
  • chopped cheese on top (optional)
  • Diced ham or bacon (optional)

Combine all ingredients except the milk into a stockpot or crockpot for 3-4 hours.
Add milk during last hour.


You start out with this much butter:

And add in there the diced potatoes:

Into the pot also go the diced celery, onion and carrots:


Put the boullion cubes in a prep bowl...

...add 1 Tbsp salt...

...and 1 Tbsp parsley flakes...

...and just a smidge of pepper...

...then pour it over all the veggies.


Add some diced chunks of butter, along with the water.

Set the crockpot for 6 hours (or about 4 hrs on low, followed by 2 hrs on high)

And walk away!


Meanwhile, you can do what you want, but what I did was set out some delicious Rhodes dinner rolls to rise on the counter:


Towards the end, you'll want to add the can of Evaporated Milk to the mixture, but not until the last 30 minutes or so:


And, of course, after you put in the evaporated milk, it'll give you just enough time to bake the rolls - 30 minutes at 350 degrees:

Cranberry Catalina Crockpot Chicken

When I saw mention of this recipe on Mark's cousin's then-fiance, Lori's facebook page, I knew I just HAD to get the recipe! How could anything with an entire bottle of Catalina dressing be anything less than incredibly tasty?

What's even better? You don't even have to thaw the chicken breasts!!

It's so easy, I'm pretty sure my 4-year-old niece could figure it out!

You put about 4 frozen chicken breasts in the crockpot:

Then pour the following 3 ingredients over the frozen chicken breasts:

...a jar of jellied cranberry sauce...

...a packet of French Onion Soup Mix...

...and a whole bottle of Catalina dressing...


You then set the crockpot to 8 hours (or your "low" setting) and walk away.


8 hours later, when you're famished, you get this:


It was delicious! I served it with rice and broccoli and it went over pretty well!

Thanks for the great recipe, Lori! I need to try this again soon!